Snow Slider!
Shoveling snow is hard work! Having the right tool will make this chore quicker and easier. You might be thinking that a powerful snowblower or wide shovel is best, but with a little handy work, you can make an even more efficient tool.
Snow shoveling means shovels, gloves, boots, and warm clothing. Moving snow out of the driveways and sidewalks is tough work. Power snowblowers are perfect for deep and heavy snow, but not all snow is the same.
Wet snow and powder snow are two different beasts. Heavy, wet snow must be moved, carried, or thrown. This means strain, sweat, and stress. Light, powder snow can be slid more easily. Most Montana snow tends to be the lighter, softer type. It is best to move it before it becomes compressed by cars or footprints. Once compressed, the snow becomes ice.
Montana Snow this year has been coming in small doses. 1-3 inches has been routine. Since we are at a higher altitude, the snow tends to be lighter and powdery. It tends to blow easily and form drifts. It also is easily compacted. Once compressed, the snow becomes a solid mass. It takes more effort and work to remove the snow once solid.
These intermittent, lighter snowfalls need to be cleared, so that they don’t build up over the winter. Many communities have a covenant or municipal requirement to keep public walkways open. Getting out the power snowblower is more effort than needed. Usually a shovel will do the trick. Using a heavy snowblower can require too much effort when the snow could be simply slid out of the way.
To address the lighter snow, try making a Snow Slider. This wooden tool will allow you to quickly move light snow in a hurry. Using this tool, you can eliminate your snow as fast as you can walk. The slider allows you to clear the entire width of your sidewalk in one swipe. Since you are sliding the snow, you don’t need to pick it up and throw it. No back pain or stress required.
Construct a wooden frame the width of your sidewalk. Let’s say the walk is 40 inches wide. The bottom blade boards need to be that width and about 16 inches high. Use thin, but not flexible wood. Strengthen the corners with plywood angles. The very bottom board needs to be angled at about 45 degrees, so that the blade will slide easily. You want the slider to be belly high. This will allow you to angle the blade and push from the waist, using both hands.
There is no one right way to build this unit. The goal is to construct a lightweight, sturdy frame that you can push the snow with. Feel free to modify and adapt the unit to meet your needs. Originally, I made my Snow Slider out of metal conduit pipe, angles, and brackets. This made the unit strong, but I found that I was always tightening and adjusting the fittings. Wood made it simple and strong.
Moving the snow to the side is easy. Simply push the snow until it fills the blade, then steer it off to the side. If you angle the blade, the snow is directed off to the side. After working the Snow Slider, you may still need to clean things up with a shovel.
The wide, curved, pusher blades are perfect for sliding snow. They come in different widths and have a PVC handle. The curved blade is made of heavy-duty plastic to keep the weight down. Metal shovels tend to be heavy and allow snow to stick to them. You can grease them up with Pam spray or wax, but they still force the user to do more work. Our goal here is to do less work, more easily and simply. Just because a shovel is heavy and strong does not mean it is smart.
The other day it snowed 3 inches. I went outside to get my paper and used the Snow Slider to make a path. My neighbor was getting out his powerful snow blower. I walked my sidewalk, driveway, and front walks while sliding the snow. In the time it took me to walk these areas, I was finished sliding the snow. Once in the house, I was reading my paper and drinking a cup of coffee when I heard my neighbor finally start up his gas blower. 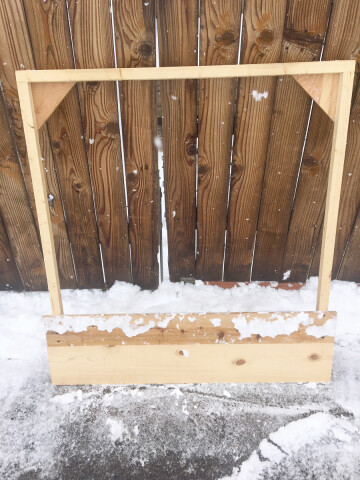
Here are the dimensions for my homemade Snow Slider.
Cost depends upon what wood scraps you may have on hand.
Use 2in. x 2in. wood for the frame. It is just the right size to wrap your hand around.
Make the Slider 48 in. tall and 45 in. wide. ( or the width of your sidewalks)
Use a 2x4 board to add weight and strength the very bottom of the frame.
Don’t forget to cut an angle along the bottom edge to allow for easy sliding.
Blade boards are ½ inch thick and 6 in. wide. Stack together for a width of 12 in.
The top two triangle corners are thin plywood 9 in. wide.
Use galvanized screws to connect all wood parts.
Hang the Snow Slider along the fence so it is handy. Use it before walking or driving on any fresh snow. If a heavy snow is predicted, address the snow in increments of 2-3 inches. It will still take less time to slide it away than using other methods. I did our last 6-inch snowfall 3 times in the time it took me to walk the area. I never needed to use a shovel or throw any snow. The neighbors are amazed at how fast and effective the Snow Slider is.
The wood will sand itself, over time, on your sidewalks, to help form the angle on the blade. The Snow Slider works best on smooth sidewalks and driveways.
If your driveway and sidewalk surface is rough and inconsistent, the blade can be modified. Simply add wheels or wood runners to elevate the blade slightly. Now you can still move the snow without getting stuck on rocks and cracks. It may not clear them completely but will still remove most of the snow.
The goal is to do the most work, more quickly, with the least effort so you can enjoy reading Bozeman Magazine with a warm cup of coffee.
Slide your snow away!